• Skip to primary navigation
  • Skip to main content
  • Skip to primary sidebar

Facial Exercise Central

Lose a Decade From Your Face!

  • Home
  • Facial Exercise Before and After
  • Facial Exercise Programs
  • Facial Exercise Instructions

Face Exercise Instructions

A Guide To The Muscles Of The Neck & Face

November 24, 2015 by Natalie Taylor

A Guide To The Muscles Of The Neck & Face

Image: Illya Zorya

The muscles of the face and neck are among the vital muscles of the body. Without them, movement and certain body functions like swallowing and chewing will be impossible. Hence, knowing what these muscles are and what they do is important as it can help us make better choices for both our health and body.

Muscles of the Face

The facial muscles is a unique muscle group. Unlike other muscles in the body that are connected solely to bones, most facial muscles connect the bones to the skin. This unique connection of muscles to bones and skin enable certain vital body functions.  For example, the muscles zygomaticus major and orbicularis oris make it possible for us to make different facial expressions and move our cheeks and lips when we speak and eat.
The simple acts of biting and chewing also involves several facial muscles. These include the mastication, masseter, and temporalis muscles. The mastication muscles move the mandible while the masseter and temporalis muscles move the jaw during chewing.
Facial muscles are responsible for tongue movement. Four sets of extrinsic muscles work together to move the tongue into any direction.
Eye movement is also made possible with facial muscles. Six extrinsic eye muscles work together in great accuracy and speed to enable eye movement and rotation. Inside the eyes is another set of muscles that make it possible for us to dilate the pupils and focus on objects.
The facial muscles are not limited to those that can be found in the eyes, cheeks, and mouth; they can also be found inside the ears. Stapedius, the smallest muscle, controls the movement of the stapes to help control the amplitude of sound waves coming from the external environment.

Muscles of the Neck

The muscles of the neck play an important role in the gross motor movement of the head and neck. These muscles, the sternocleidomastoid and the trapezius, work together so we can move our head in every direction that we want.
By working in pairs, these muscles enable us to flex or extend our head and neck. And by working individually, these muscles enable head rotation or neck flexion either to the left or right.

Taking Care of the Face and Neck Muscles

Just like the rest of the muscles of the body, our face and neck muscles can also lose their elasticity and flexibility in the long run. And just like the rest of our muscles, they need to be ‘worked out’ to keep them from sagging.
It’s when the muscles of the face and neck start to sag that the signs of aging become more apparent. This is where facial exercise becomes beneficial.
Facial exercise is created out of a basic premise that the facial muscles are just like the other muscles of the body. If they are not ‘moved’ regularly, they can sag and make you look old.
Facial exercise advocates advise doing it for at least a minute on a regular basis (the earlier, the better) to make the most of its benefits.
For starters, here’s some examples of facial exercise routines that can be easily done at home:

Forehead exercise: Place your hand on the side of your forehead, just near your temple. Make sure that your thumb is positioned nicely at the lower hairline while the pinky finger at the end of your eyebrow. Use your pinky finger to gently pull your skin towards your hairline. While your skin is taut, move your eyebrows rapidly up and down.
Another way to exercise the muscles of your forehead is to raise your eyebrow as high as possible while you pull the skin taut. Hold it for 5 seconds then repeat gain. You can repeat this routine for 5 times each day.
Cheeks exercise: Start by placing an index finger on the middle of your cheeks. Then, start making small but firm outer circles. While you do this, make an “O” shape from your lips, extending it as far as possible. Pull your lips back and do it again.
Neck exercise: While tipping your head back, slide your lower lip over your upper lip. Hold it for 5 seconds then relax. Repeat it for five times.

The facial gestures and head movements we do each day may seem so simple but behind them is a network of muscles working together to make them possible. So take care of them. Simple routines like the ones outlined above can benefit not just your facial muscles but as well your skin.

Filed Under: Face Exercise Instructions, Facial Exercise, Facial Exercisers

Facial Exercises for Nasolabial Lines

March 12, 2012 by Natalie Taylor

facial exercises for nasolabial lines

Facial exercises for nasolabial lines will reduce these “smile lines” that run from the sides of the nose to the corners of the mouth. The name comes from the Latin words for nose and lip. Some people refer to them as “laughter lines” or “smile lines.” However, if you are worried about facial aging, these lines won’t make you feel like laughing or smiling, because in my opinion, they are the most aging lines that can appear on the face.
The nasolabial folds are  rarely, if ever seen on a young face, but can start to appear anytime after the age of 30, though they do not usually become worryingly pronounced until the 40s. There are several factors that contribute to the severity of nasolabial folds, including the thinning of the skin, excess cheek fat and the drooping of the cheek fat.
According to the late Senta Maria Runge, who produced one of the first books on facial exercise, Face Lifting By Exercise, nasolabial lines are more commonly caused by the collapse of the cheek muscles. Senta wrote: “The collapse of the upper cheek muscles alone, may cause more than fifty percent of the aging in a face, and consequently the elimination of the same may contribute equally to a younger look.”
Or in other words, simply by lifting the upper cheek muscles, you can eliminate half of the problem that is making your face looked aged.
When you consider most of use would blame the aging look on about sis different areas of the face which are commonly; furrowed brow, lip lines, turkey neck, crows feet, smile lines and between brow lines, to think that lifting this one muscle will make such a huge improvement is important.
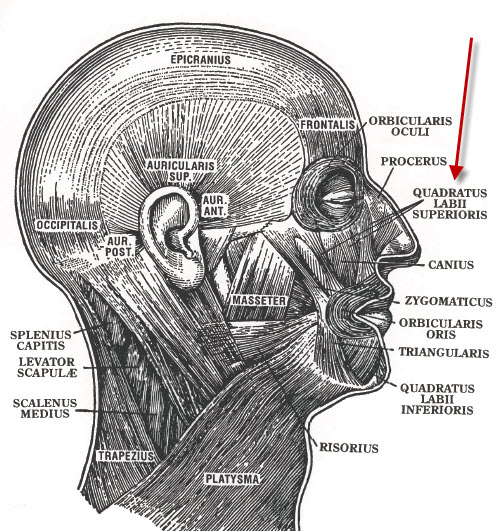
Take a look at the facial muscles in the picture below to get an idea of why the nasolabial folds appear when the cheek muscles become longer and slack.
 

nasolabial lines

 
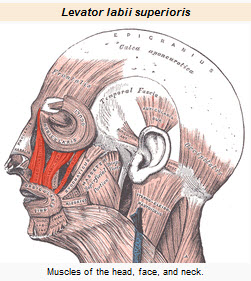
As this diagram demonstrates, the muscles we need to concentrate on when doing facial exercises for nasolabial lines is the “Quadratus Labii Superioris”. The wikipedia image below shows how this broad flat muscle splits into three parts.

labii superioris

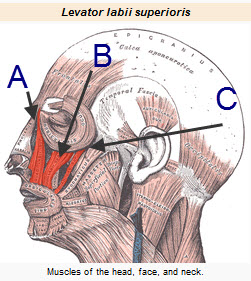
If you are reading this page, I am assuming you have nasolabial folds, so look in a mirror while you have this diagram in front of you, and pull the skin up at point A, B, or C. (See below).

Facial exercises for nasolabial folds

You will immediately see how the lines become almost invisible, and how pulling the skin at the three different points affects different parts of the folds. This explains why some people seem to have deep folds at the side of the nose that fade before they get to the mouth, and why others seem to not have a problem near the nose but have bad folds nearer the mouth. The muscle has become more slack at one of the three splits than the others. My guess is this will depend on the facial expressions we typically pull – not because they make the folds worse, but because they actually make parts of the muscle stronger and less slack than other parts.
As we can see by the diagrams, we have to strengthen the muscles in three directions. This shows why many people who practice facial exercises for nasolabial folds regularly complain they have little success with improving the folds, because they are typically anchoring the muscle in only one direction, when all three need to be addressed – depending on your own individual lines, you will probably see if you only pull the skin up at point C, the part of the nasolabial fold by the side of your face still appears fairly deep although there is great improvement in the area by your lip.
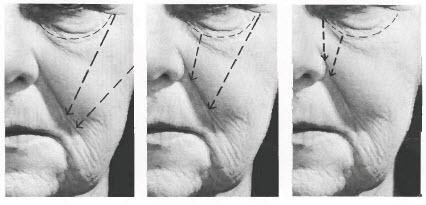
You can see how this happens by looking at the image below. The area between the two dotted lines in each picture gives us a rough idea of  where the muscle lies, and helps us to visualize the directions we need to work the muscle – i.e. Up toward the inner corner of the eye, toward the center of each eye, and also toward the outer corners of the eyes.

Facial exercise for nasolabial folds

Make sure you study the diagrams above and are familiar with the location of the muscles.


Facial Exercises for Nasolabial Folds Instructions

Step 1
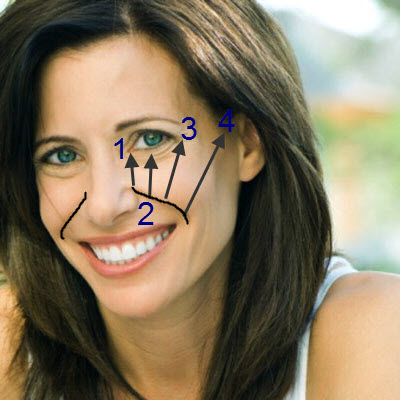
Sitting in front of a mirror, preferably with your elbows resting on a table, take an eyebrow pencil and draw a line down your nasolabial folds. Next draw four arrows on the points on the nasolabial lines pointing in a upward direction as shown on the diagram below. Don’t include the numbers!
(You only need to do this on the first day, but DO NOT skip this step, as it is very important to ensure you know how to lift your cheeks correctly!)

 
Step 2
Start with the line closest to your nose, line “1”. Lift the muscle up under the line you have drawn. You should do each cheek individually and together. Spend several minutes working only the muscle under line 1, and not all the cheek muscles together. Keep on doing this until you are sure can distinguish between the lines and work each one totally dependent of the others. Some people can achieve this is one session, for others it may take several days, or even weeks if the muscles have become very slack or weak.
Do not go onto step 3 until you are absolutely sure you have mastered step 2. You might be impatient to proceed, but unless you master step 2 completely, you won’t get the desired results.
Be careful with line 4, that you are actually using the cheek muscle Labii Superioris, and not the muscle located on the mouth corners that is used to stretch your mouth into a smile. When performed correctly, your nasolabial lines should lift toward the corner of your eyes and temples, rather than stretch  horizontally toward your ear lobe as they do when you are smiling. The difference is very small, so you will probably need to spend some time on mastering this.
Tip: When lifting lines one or two, you will appear to be sneering. When working on 3 and 4, your facial expression will more resemble a smile.
 
Step 3
For several days spend some minutes working the four lines individually in steps. Lift each line in five stages, and lower them in three. Gradually increase this number until you can lift each line in 10 stages and lower them in five. This will take a few days to master, so take your time. As you do this, you will probably feel the muscle twitching or fluttering under your skin. This is a good sign. This can be done throughout the day at intervals, or in one session, but it is difficult to do it correctly without a mirror unless you are experienced, so practice as often as possible when you have a mirror at hand.
 
Step 4
By now, you should be able to a good lift each line totally independently of the others in as many as 10 stages, and lower them in five. You should also be able to work both cheeks simultaneously, or separately. This will probably be at least three days after you first began the steps. If you are only one day in, practice more! It takes time to learn this correctly, and by hurrying through the stages you will not achieve the greatest benefits.
 
Step 5
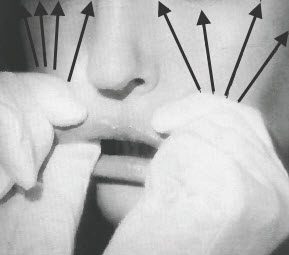
For this exercise, I really do recommend you use cotton cosmetic gloves. I used to think that programs that recommend these  (For example, Cynthia Rowland’s Facial Magic) were being overtly fussy. But you simply cannot get a good grip on certain muscles without them, and not gripping the muscles correctly when doing this exercise can cause adverse effects. At the end of the page I have put two links where you can purchase cosmetic gloves, if like me you cannot find them locally.
With your gloves on, place your thumbs inside your mouth behind the lines. Push outwards, and the lines should disappear. You should o this to make sure your thumbs are in the correct position. Grasp outside the lines with the side of your index fingers. Pull your lips down somewhat making sure your grasp is firmly on the nasolabial line and not beneath it. It is very important because if you grasp too far down, it can stretch the cheek muscles. So make absolutely sure your grasp is on the line itself.
Step 6


Exercise for nasolabial folds
With your fingers firmly gripping the cheek muscle as seen in the picture above, begin to slowly flex your muscles in all four directions simultaneously. Do this gradually, moving the muscles upward in 5 to 10 steps and lowering them in 3 to 6 steps. Over time, you should gradually increase this to 15 steps up, and about 7 steps down.
The exercise should be repeated once a day, five times. After each rep, take your hands out of your mouth and then replace them.
When performed correctly, you will see immediate improvement after you do this exercise, although your face may be a little red where you have gripped the muscles. Although at first the improvements you observe will be temporary, over a few weeks, the results will last longer each time, until they become permanent.
Notes:You may you notice that part of the lines are showing an improvement, but other parts continue to remain deep.
For example, you might see that the end of the lines near the nose are improving, but they are still quite deep by the corners of your mouth. Therefore, as well doing the daily exercise as mentioned above, you should also do some extra reps on the parts of the line that are most severe.
So, if you have deep lines near the outer corners of the mouth, place your thumbs directly underneath the worst areas, grip, and proceed to lift the muscles corresponding to this area. If the problem is at the outer corners of the mouth you will lift the muscles three and four, as per the numbered diagram, while allowing muscles 1 and 2 to remain relaxed. this is why it is important to train each muscle individually before starting the daily routine.
If you have worst lines near your nose, peg your thumbs directly on the deep part of the line, and pull down somewhat. Grip, and proceed to lift the muscles numbered one and two. You will soon see an improvement in the worst affected parts of the line plus an overall lessening of the lines in general.

Facial Exercise Gloves

In order to be able to facial exercises for nasolabial lines efficiently, you will need cotton facial exercise gloves, or a clean cotton cloth to help you get a firm grip. Remember, a bad grip can make the lines worse.
Where to Buy Cotton Gloves

3 Pair of Gloves – Gloves Facial Exercises for Nasolabial Lines
 – $6.95
Retail Price: $16.95
You Save: $10.00
from: Rejenuve, Inc.
Amazon.com
[amzn_product_inline asin=’B0051173DA’]
Recommended Product
[amzn_product_inline asin=’0960104283′]

Filed Under: Face Exercise Instructions

Facial Exercise for Brow Lines

January 25, 2012 by Natalie Taylor

Lines that run horizontally across the forehead are somewhat different to the majority of facial wrinkles, because they are expression lines as opposed to lines that form due to the slacking of facial muscles, according to Senta Maria Rungé, who was the author of the classic book “Face Lifting by Exercise.”
Therefore, these types of lines can also be seen on younger people who are in the habit of frowning or raising their brows a lot.
Find instructions for facial exercise for brow lines below.
The first instructions for getting rid of brow lines is an exercise from the aforementioned book, “Face Lifting by Exercise” by Senta Maria Rungé. You can do this exercise either sitting down or in a standing position, though preferably in front of a mirror. You might also want to wear cotton gloves, because it gives you a much better grip. If you don’t have cotton cosmetic gloves, I’ve provided a couple of links at the bottom of this page, as you will find they are useful for quite a variety of facial exercises, as they help you get a much better anchor.

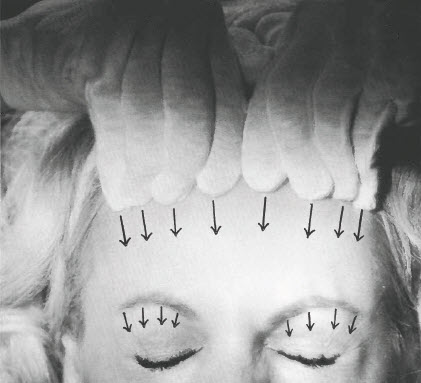
Facial exercise for brow lines

Step one: Put your fingers in a row above the highest horizontal line on your brow. Rest the fingers firmly against the bone.
Step two: Push the skin upwards towards your hairline as much as you possibly can. Hold the skin in this position against the bone tightly. This creates resistance for the exercise.
Step three: While maintaining the resistance firmly, move your eyebrows down, without closing your eyes, then move the forehead muscles down. Slowly close your eyes tightly.
Step four: Return your muscles gradually to the starting position and take your fingers away.
Do this five times removing your fingers and observing the results between each rep.
Once you get more accustomed to the exercise, start doing the movements in steps. Aim to do five steps with your eyebrows, and 10 steps for the forehead muscles.  Close your eyes to a count of six. Return the muscles in 10 gradual steps.
 
Another good Facial Exercise for Brow Lines is one by Carole Maggio from Facercise.
I like this brow exercise particularly, because it can be done while driving or working on the PC.
Put your thumb and index finger of one hand about an inch above your eyebrow. Push them down so your fingers are almost left on the top of your eyebrow. Raise the eyebrow as far as possible and release. Do this at least 10 times. Lastly, hold your brows up while your fingers are pushed down. Hold this position for around 20 seconds.
For more information about Carole’s Facercise Program, see the link below.
[amzn_product_inline asin=’0399527834′]
 

Facial Exercise for Brown Lines Video

The YouTube video below does a very good job of demonstrating facial exercises for brow lines. Don’t be put off because the couple appear young – it could just be that they are achieving good results!


Where to buy cotton gloves to help create more resistance when doing facial exercises:

3 Pair of Gloves – Fresh Gloves for your Facial Magic Exercise Program – $6.95

Retail Price: $16.95
You Save: $10.00
Or get them on Amazon – Amazon.com: Cotton Gloves- White (Pack of 12)

Filed Under: Face Exercise Instructions

Crows Feet Exercises

August 15, 2011 by Natalie Taylor

Crow’s feet are the crinkly lines that appear at the outer corners of the eyes. As the skin around the eyes is thinner than on other parts of the face, crow’s feet lines often appear as early as in the mid-20s. Avoiding smoky atmospheres and using sunscreen will surely help prevent crow’s feet, and crows feet exercises will help diminish them – even if they are quite deep.
Squinting is likely to make crow’s feet worse. You don’t have to be in bright sunlight to squint; you might be squinting without realizing when working at the computer or watching TV. If you find yourself frequently squinting, it may be a good idea to visit an optician to see if there is a problem with your eyesight. Bright sunshine squinting can usually easily rectified with a pair of good-quality sunglasses.

Crows Feet Exercises Instructions

The top facial exercise trainers recommend quite similar exercises to reduce crow’s feet. Deborah Crowley from Flex Effect, and Carolyn Cleaves from Carolyn’s Facial Fitness, both recommend exercises that involve covering the lines with your fingers and pulling them toward the hairline, while squeezing your eyes tightly shut. The following video shows Carolyn Cleaves from Carolyn’s Facial Fitness demonstrating this effective crow’s feet exercise.

An alternative simple exercise to reduce crow’s feet is to place the sides of your index fingers on the outer corners of your eyes and quickly open and close your eyes, around 30 to 60 times. As you do this, your fingers will move with the muscles toward the center of your face. Don’t try to stop this, the added weight of your fingers is enough to build the orbicularis occuli, which is a muscle that encircles the entire eye. Do these crows feet exercises at least once a day for maximum results.
Carolyn Cleaves Facial Fitness Program on Amazon – Recommended Product
[amzn_product_inline asin=’B002Z28U30′]

Filed Under: Face Exercise Instructions

Double Chin Exercise

August 15, 2011 by Natalie Taylor

Double chins are often present in people who are overweight, as the body deposits excess fat in the places it thinks it will do the least harm, away from vital organs. However, you may also develop a double chin or even double chin, without being excessively overweight, due to aging or genetics. If aging is the reason, the musculus mylohyoideus muscle (which is located under the chin) has likely become weak and slackened
There are many facial exercises for a double chin, but rather than listing a whole bunch of double chin exercises here that might be hard to remember or execute, I have provided the three types of double chin exercises I personally have found to be most beneficial. As well as performing the double chin exercises, be sure to also do facial exercises for jowls to further help tighten the muscles of the lower face.

Double Chin Exercise Instructions

Tongue Exercise

If I could only do one double chin exercise, then this exercise is the one I would choose. It can be performed anywhere, usually even if other people are around. It is completely “hands-free” which is my preferred type of face exercise, as you can do them while performing other more interesting tasks such as when working on the computer,Double chin exercise reading, or even when you are driving.
With your mouth closed, but relaxed, curl your tongue back toward your throat. try to do this without touching the tip of the tongue to the back of the tongue. Hold the pose for at least 30 seconds, while exerting as much force as possible. Keep the rest of the face as relaxed as you can, especially around the eye area.
Alternatively, hold the pose for 5 seconds, relax, and repeat 10 times.
When your tongue is as far back as it will go, if you place a hand under your chin or along your jaw line, you will notice the muscles are taut. Try to do the exercise at least twice a day for fast results.
Chin Toner
The following chin exercise is from the excellent massage and facial exercise book Joseph’s Corvo’s Zone Therapy, with a slight adaption I introduced myself.
Allow your head to sit naturally on the center of your shoulders and look straight ahead. Place the palm of your hand on your forehead. Attempt to bring your head down, while exerting strong resistance with your hand. When the tip of your chin touches your chest, position your hand on the back of your head between the crown and nape of your neck. Force your head to return to it’s normal position, while pushing strongly against it with your hand.
In addition, you can use my adaption and move the head from side to side while creating resistance with your hands placed just above your ears.
You can see how effective the chin toner is by placing your free hand underneath your chin while performing the exercise. You will feel the muscle is tight and firm.

Neck Lift


A third facial exercise to reduce a double chin that I believe to be super-effective is from Juliette Kando’s “Natural Facelift”.
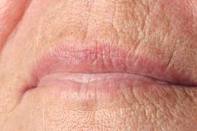
This double chin exercise can be done before you even get up in the morning, which makes it one of my preferred exercises, as it doesn’t take time away from other tasks you need to perform during the day.

Lie on your bed (or a sofa) and allow your head to dangle over the edge. Slowly raise your head until your chin touches your chest; hold for a few seconds and gradually lower it again to the starting position. Repeat at least ten times daily. When you feel your muscles growing stronger and find the exercise easy, increase the number of repetitions.

TIP: For faster results, combine the tongue Double Chin Exercise with the neck lift. It is unlikely you will be able to perform 10 reps the first time, so start with whatever you can do, and increase by one rep a day. Once you get to 30 reps a day, your double chin will very much be a thing of the past.

Filed Under: Face Exercise Instructions

Facial Exercises for Lips

August 15, 2011 by Natalie Taylor

I think of all the lines that may appear on the face, lip lines can be the most noticeable and aggravating. I always remember as a child being fascinated by my grandmother’s mouth as her lipstick would “bleed” in tiny rivers down the deep lip lines she had. Had she known about facial exercises for lips and wrinkles, it might have been a different story! Although she seemed ancient to me at the time, the truth was she was probably only around 50.
Compared to women, men seem to suffer much less from these aggravating wrinkles. This is probably because they have much thicker skin round the mouth as it is bolstered up with hair follicles.
There is no doubt in my mind that smoking makes lip lines significantly worse. I have two friends who continue to smoke in their 50s, and both of them have extremely deep lip wrinkles. Therefore, if you are a woman who smokes and you want to use facial exercises for lips, to see results it is imperative to stop smoking! I do not say this light-heartedly, as I was a smoker myself for more than 20 years. I finally managed to stop at the age of 34 (I started when I was 11) and it took three years of trying before I managed to quit. At that time I did not have any concerns about the aging aspect of my face, but within a very short time, I was amazed at the improvement to my skin. For anyone who is struggling to stop smoking I wholeheartedly recommend Allen Carr’s “Easy Way to Stop Smoking.”  (See link at the end of this article).
Facial Exercises for Lips
In spite of my years of smoking, I have found the area around my mouth has responded very well to facial exercise, and I have only a few very fine lines around the mouth.
I recommend the following two facial exercises for lips to reduce annoying lip lines and wrinkles.

Lip Press

Deborah Crowley’s excellent FlexEffect Facial Training has several effective exercises to strengthen the orbicularis oris, which is the muscle that circles the entire mouth.
The lip press is very simple but powerful. Wrap your lips over your teeth, and bite down. Move your mouth from side-to-side, as you press your lips together as though blotting. While you should not bite hard enough to cause pain, you should exert enough pressure to almost cause mild discomfort. Temporary results can be seen instantly, and after a week a two, you should see a permanent reduction in the severity of your lip lines.
This exercise has the additional advantage that is “hands-off” and can be performed anywhere. Like other hands-off exercises, I often do it when driving.

Lip Curl

The lip curl is a great exercise from Louise Annette’s “Ageless If We Dare” book.
To do the lip curl, place the three middle fingers of your dominant hand just above your top lip. The middle finger should be resting in the grove from your nose, and the other fingers can be placed at any point on either side. Press down firmly, and against the resistance of your fingers, try to curl your upper lip outward in a fish-like pout, aiming to touch it to the tip of your nose.
For those who wish to give up smoking which will reduce lip lines more than anything else you can do:
[amzn_product_inline asin=’0615482155′]

Filed Under: Face Exercise Instructions

  • « Go to Previous Page
  • Page 1
  • Page 2
  • Page 3
  • Page 4
  • Go to Next Page »

Primary Sidebar

Recent Posts

  • How to Accentuate Your Cheek Bones, the Right Way
  • Can Your Skin Become Immune To Skin Care Products?
  • Wash Face Post-Workout: Yay or Nay?
  • How Does Diet Affect Your Hair?
  • Jack LaLanne: The Pioneer Of Facial Exercises

Facial Exercise Programs

  • What is the suitable age for facial exercises?
  • 4 Signs You Need A Facial Exercise Program
  • Carolyn's Facial Fitness
  • Cynthia Rowland Facial Exercise
  • Facercise by Carole Maggio
  • FlexEffect by Deborah Crowley

Copyright © 2025 · AIKO Theme on Genesis Framework · WordPress · Log in