Facial exercises for nasolabial lines will reduce these “smile lines” that run from the sides of the nose to the corners of the mouth. The name comes from the Latin words for nose and lip. Some people refer to them as “laughter lines” or “smile lines.” However, if you are worried about facial aging, these lines won’t make you feel like laughing or smiling, because in my opinion, they are the most aging lines that can appear on the face.
The nasolabial folds are rarely, if ever seen on a young face, but can start to appear anytime after the age of 30, though they do not usually become worryingly pronounced until the 40s. There are several factors that contribute to the severity of nasolabial folds, including the thinning of the skin, excess cheek fat and the drooping of the cheek fat.
According to the late Senta Maria Runge, who produced one of the first books on facial exercise, Face Lifting By Exercise, nasolabial lines are more commonly caused by the collapse of the cheek muscles. Senta wrote: “The collapse of the upper cheek muscles alone, may cause more than fifty percent of the aging in a face, and consequently the elimination of the same may contribute equally to a younger look.”
Or in other words, simply by lifting the upper cheek muscles, you can eliminate half of the problem that is making your face looked aged.
When you consider most of use would blame the aging look on about sis different areas of the face which are commonly; furrowed brow, lip lines, turkey neck, crows feet, smile lines and between brow lines, to think that lifting this one muscle will make such a huge improvement is important.
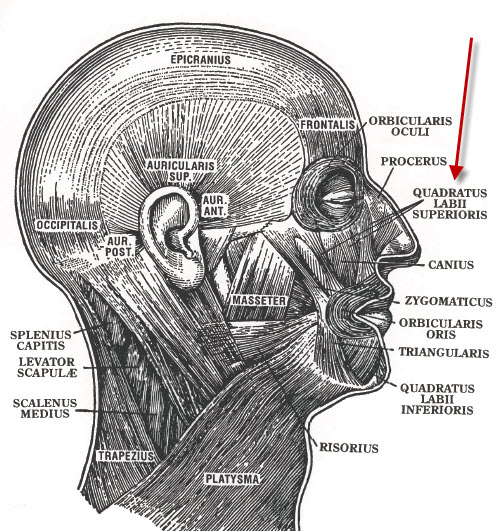
Take a look at the facial muscles in the picture below to get an idea of why the nasolabial folds appear when the cheek muscles become longer and slack.
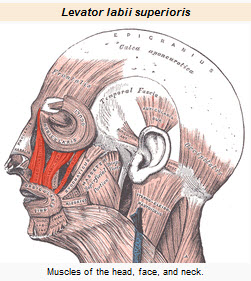
As this diagram demonstrates, the muscles we need to concentrate on when doing facial exercises for nasolabial lines is the “Quadratus Labii Superioris”. The wikipedia image below shows how this broad flat muscle splits into three parts.
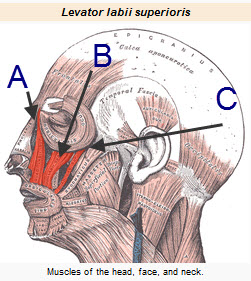
If you are reading this page, I am assuming you have nasolabial folds, so look in a mirror while you have this diagram in front of you, and pull the skin up at point A, B, or C. (See below).
You will immediately see how the lines become almost invisible, and how pulling the skin at the three different points affects different parts of the folds. This explains why some people seem to have deep folds at the side of the nose that fade before they get to the mouth, and why others seem to not have a problem near the nose but have bad folds nearer the mouth. The muscle has become more slack at one of the three splits than the others. My guess is this will depend on the facial expressions we typically pull – not because they make the folds worse, but because they actually make parts of the muscle stronger and less slack than other parts.
As we can see by the diagrams, we have to strengthen the muscles in three directions. This shows why many people who practice facial exercises for nasolabial folds regularly complain they have little success with improving the folds, because they are typically anchoring the muscle in only one direction, when all three need to be addressed – depending on your own individual lines, you will probably see if you only pull the skin up at point C, the part of the nasolabial fold by the side of your face still appears fairly deep although there is great improvement in the area by your lip.
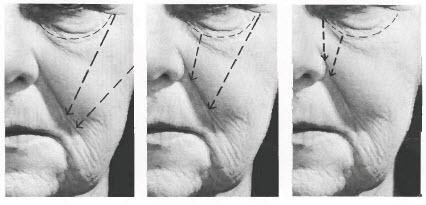
You can see how this happens by looking at the image below. The area between the two dotted lines in each picture gives us a rough idea of where the muscle lies, and helps us to visualize the directions we need to work the muscle – i.e. Up toward the inner corner of the eye, toward the center of each eye, and also toward the outer corners of the eyes.
Make sure you study the diagrams above and are familiar with the location of the muscles.
Facial Exercises for Nasolabial Folds Instructions
Step 1
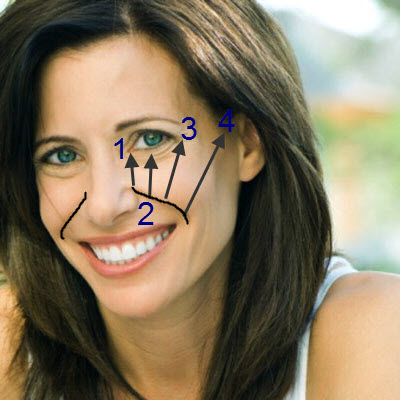
Sitting in front of a mirror, preferably with your elbows resting on a table, take an eyebrow pencil and draw a line down your nasolabial folds. Next draw four arrows on the points on the nasolabial lines pointing in a upward direction as shown on the diagram below. Don’t include the numbers!
(You only need to do this on the first day, but DO NOT skip this step, as it is very important to ensure you know how to lift your cheeks correctly!)
Step 2
Start with the line closest to your nose, line “1”. Lift the muscle up under the line you have drawn. You should do each cheek individually and together. Spend several minutes working only the muscle under line 1, and not all the cheek muscles together. Keep on doing this until you are sure can distinguish between the lines and work each one totally dependent of the others. Some people can achieve this is one session, for others it may take several days, or even weeks if the muscles have become very slack or weak.
Do not go onto step 3 until you are absolutely sure you have mastered step 2. You might be impatient to proceed, but unless you master step 2 completely, you won’t get the desired results.
Be careful with line 4, that you are actually using the cheek muscle Labii Superioris, and not the muscle located on the mouth corners that is used to stretch your mouth into a smile. When performed correctly, your nasolabial lines should lift toward the corner of your eyes and temples, rather than stretch horizontally toward your ear lobe as they do when you are smiling. The difference is very small, so you will probably need to spend some time on mastering this.
Tip: When lifting lines one or two, you will appear to be sneering. When working on 3 and 4, your facial expression will more resemble a smile.
Step 3
For several days spend some minutes working the four lines individually in steps. Lift each line in five stages, and lower them in three. Gradually increase this number until you can lift each line in 10 stages and lower them in five. This will take a few days to master, so take your time. As you do this, you will probably feel the muscle twitching or fluttering under your skin. This is a good sign. This can be done throughout the day at intervals, or in one session, but it is difficult to do it correctly without a mirror unless you are experienced, so practice as often as possible when you have a mirror at hand.
Step 4
By now, you should be able to a good lift each line totally independently of the others in as many as 10 stages, and lower them in five. You should also be able to work both cheeks simultaneously, or separately. This will probably be at least three days after you first began the steps. If you are only one day in, practice more! It takes time to learn this correctly, and by hurrying through the stages you will not achieve the greatest benefits.
Step 5
For this exercise, I really do recommend you use cotton cosmetic gloves. I used to think that programs that recommend these (For example, Cynthia Rowland’s Facial Magic) were being overtly fussy. But you simply cannot get a good grip on certain muscles without them, and not gripping the muscles correctly when doing this exercise can cause adverse effects. At the end of the page I have put two links where you can purchase cosmetic gloves, if like me you cannot find them locally.
With your gloves on, place your thumbs inside your mouth behind the lines. Push outwards, and the lines should disappear. You should o this to make sure your thumbs are in the correct position. Grasp outside the lines with the side of your index fingers. Pull your lips down somewhat making sure your grasp is firmly on the nasolabial line and not beneath it. It is very important because if you grasp too far down, it can stretch the cheek muscles. So make absolutely sure your grasp is on the line itself.
Step 6
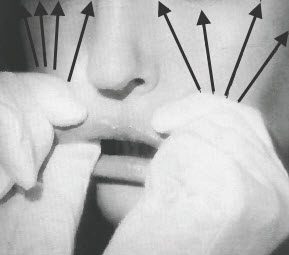
With your fingers firmly gripping the cheek muscle as seen in the picture above, begin to slowly flex your muscles in all four directions simultaneously. Do this gradually, moving the muscles upward in 5 to 10 steps and lowering them in 3 to 6 steps. Over time, you should gradually increase this to 15 steps up, and about 7 steps down.
The exercise should be repeated once a day, five times. After each rep, take your hands out of your mouth and then replace them.
When performed correctly, you will see immediate improvement after you do this exercise, although your face may be a little red where you have gripped the muscles. Although at first the improvements you observe will be temporary, over a few weeks, the results will last longer each time, until they become permanent.
Notes:You may you notice that part of the lines are showing an improvement, but other parts continue to remain deep.
For example, you might see that the end of the lines near the nose are improving, but they are still quite deep by the corners of your mouth. Therefore, as well doing the daily exercise as mentioned above, you should also do some extra reps on the parts of the line that are most severe.
So, if you have deep lines near the outer corners of the mouth, place your thumbs directly underneath the worst areas, grip, and proceed to lift the muscles corresponding to this area. If the problem is at the outer corners of the mouth you will lift the muscles three and four, as per the numbered diagram, while allowing muscles 1 and 2 to remain relaxed. this is why it is important to train each muscle individually before starting the daily routine.
If you have worst lines near your nose, peg your thumbs directly on the deep part of the line, and pull down somewhat. Grip, and proceed to lift the muscles numbered one and two. You will soon see an improvement in the worst affected parts of the line plus an overall lessening of the lines in general.
Facial Exercise Gloves
In order to be able to facial exercises for nasolabial lines efficiently, you will need cotton facial exercise gloves, or a clean cotton cloth to help you get a firm grip. Remember, a bad grip can make the lines worse.
Where to Buy Cotton Gloves

3 Pair of Gloves – Gloves Facial Exercises for Nasolabial Lines – $6.95
Retail Price: $16.95
You Save: $10.00
from: Rejenuve, Inc.
Amazon.com
[amzn_product_inline asin=’B0051173DA’]
Recommended Product
[amzn_product_inline asin=’0960104283′]

